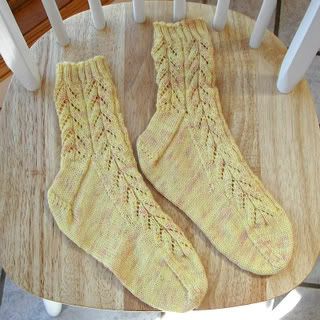
Don't ask me what the heck I think I'm up to. I'm completely ignoring my entire to-do list today because I actually :gasp: made up my own pattern for a pair of socks for my daughter. And not because I think I have anything like a designer hiding inside, but only because I know how hard it is to find tween patterns for anything out there, I made the effort of writing down what I did and presenting it to you. So if you need to make some cutesy socks that knit up pretty fast, please feel free to take the pattern! All I ask is that you don't share the pattern but direct friends here to get it themselves, and don't sell anything you make from it. It's also available via Google Documents, HERE.

Diamond Valentine Socks
by CindyS
Visit my blog!
These girly and lacy socks were designed for my nine-year-old daughter. Please note that the instructions are given for knitting the socks two-at-once, toe-up. There are several resources for learning to knit socks this way, but I highly recommend the tutorials at Come To Silver. If you have never knit this way before, I suggest doing a small practice sock first, or simply adjust the pattern to work with your sock-knitting method.
Materials
2 skeins Moda Dea Sassy Stripes (50 g/1.67 oz, 147 yds/135 m) or similar
DK weight yarn
One 40" circular needle, size 4
Yarn needle for weaving in ends
Gauge
21 stitches per 4 inches in stockinette
Sizing
These socks fit my 9 year old daughter a bit loosely, and she wears a size 4 shoe. They are stretchy enough that they almost fit me, a woman's large, so they are pretty adaptable as far as size goes. They are easily adjusted for a larger foot by increasing the number of cast-on stitches as well as the number of knit and/or purl stitches on either side of the center motif. Adjust foot length accordingly.
Cast On
Using Judy Becker's Magic Cast-On, cast on 8 stitches per needle for sock A. Slide the cast-on stitches to the cable and cast on 8 stitches per needle a second time for sock B. Begin by knitting around all stitches one round. Mark the instep of sock A with a stitch marker to help you keep your place. If you have cast on correctly, you should be knitting the instep of sock A, followed by the instep of sock B, then the sole of sock B, and lastly the sole of sock A. This brings you back to the marker.
Toe Increases
On the instep of sock A, knit into the front and back of the first stitch. Knit to the second-to-last stitch, knit into the front and back. Knit into the final stitch. Repeat for the instep of sock B, repeat for soles of socks B and A. Knit one round even. Continue increasing every other row until you have 48 stitches per sock (24 on the instep and 24 on the sole of each sock). The toe should be approximately 2 inches long.
Foot
Setup round: P24 for insteps of sock A and B, K24 for soles of sock B and A.
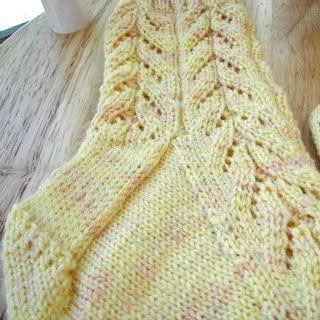
Below is the stitch pattern for the instep of each sock. Follow the pattern for the instep of sock A, repeat for the instep of sock B. Then KNIT across the sole of sock B, and knit across the sole of sock A.
Row 1: K5, P2, K2, K2tog, yo, K2tog but do not remove stitch from left needle, K into first stitch again and slip both stitches off, yo, skp (slip one stitch purlwise, knit the next stitch, the pass the slipped stitch over the knit stitch), K2, P2, K5.
Row 2: K5, P2, K10, P2, K5
Row 3: K5, P2, K1, K2tog, yo, K4, yo, skp, K1, P2, K5
Row 4: K5, P2, K10, P2, K5
Row 5: K5, P2, K2tog, yo, K1, K2tog, yo TWICE, skp, K1, yo, skp, P2, K5
Row 6: K5, P6, K1, P7, K5
Row 7: K5, P2, K2, yo, skp, K2, K2tog, yo, K2, P2, K5
Row 8: K5, P2, K10, P2, K5
Row 9: K5, P2, K3, yo, skp, K2tog, yo, K3, P2, K5
Row 10: K5, P2, K10, P2, K5
Repeat these 10 rows 3 times, to a length of about 5 3/4 inches. IMPORTANT!!!! On your final repeat of the pattern you must STOP after knitting the last row on the instep of sock B. Beginning with this last section of sole stitches we will turn the heel.
Heel
You can use whatever method you prefer for the heel, but for my sample sock I used the method from Cat Bordhi's YouTube videos which can be found HERE and HERE.
Knit to the next-to-last stitch on the sole of sock B. Wrap, and turn.
Purl to the next to last stitch, wrap, and turn. (You may find it helpful to place a stitch marker after each wrapped stitch, so you don't accidentally wrap the same stitch multiple times.)
Knit to three stitches before end of row. (This will be the stitch before the one you wrapped.) Wrap and turn.
Purl to three stitches before end of row. Wrap and turn.
Continue in this manner, knitting or purling to the last stitch before a wrapped stitch, wrap the unwrapped stitch, and turn. Do this until you have 8 wrapped stitches on either side and 8 unwrapped stitches in the center.
Knit across to the first wrapped stitch. Knit the wrap together with the stitch by lifting the wrap over the stitch and knitting the two together (seriously, watch the videos linked above). Repeat 6 times until there is one wrapped and one unwrapped stitch left. DO NOT PURL BACK UNTIL ALL WRAPPED STITCHES ARE KNIT. When you reach the last wrapped stitch, lift the wrap over it then knit these two stitches together with the final stitch on the row (which was unwrapped). Turn.
Purl across to the first wrapped stitch. Purl the wrap together with the stitch by lifting the wrap over the stitch from the knit side and purling the two together. Again, watching those videos will make this so much clearer. Repeat 6 times until there is one wrapped and one unwrapped stitch left. DO NOT KNIT BACK UNTIL ALL WRAPPED STITCHES ARE KNIT. When you reach the last wrapped stitch, lift the wrap over it then purl these two stitches together with the final stitch on the row (which was unwrapped). Turn.
Now, each sock has 24 stitches on the instep and 22 stitches on the heel. As we go around to begin the leg, we will add those missing stitches back in.
Knit across all sole stitches of sock B. At the end of the row, M1 by picking up the bar between the stitches of the row below. This helps close any holes between the heel and the foot, as well as making up for the decreases we did at the end of the heel. Now switch over to sock A and turn the heel as outlined above. Don't forget to knit back across after the final purl row, and M1 at the end of that knit row.
Leg
You are now ready to begin the legs of the socks. Because you stopped on row 10 when you began turning the heel, you simply need to begin the stitch pattern from row 1 on the sock insteps. Knit Row 1 across sock A, and again across sock B. At the beginning of the back/heel stitches of sock B, M1 again to make up for the second decreased stitch we made on the sock. Knit across sock B. When you begin the back/heel stitches of sock A, M1 there as well. We are now back to having 24 stitches on the instep and 24 stitches on the back/heel of the sock.
Continue knitting the pattern stitch across the insteps and knitting across the back of the leg. Alternately, you can begin to knit the pattern stitch across the back of the leg at this point if you wish. Knit until the leg is the length you like.
Cuff
To make the purl stitches of this K2P2 ribbing line up with the purls in the pattern, knit your cuff as follows:
K1, *P2, K2* repeat between the * 5 times, P2, K1
Repeat this pattern on each needle until cuff is about 1 inch. Bind off and weave in ends. Enjoy!
|


